
Progress has been stop and go as I make some headway and then discover some part or tool that I need to continue and them I’m left waiting for the necessary item to continue onward.
After getting the transmission on I turned my attention to the timing belt and water pump. I have a number of guides for doing this as well as having the JHMotorsports timing belt DVD. A couple timing belts back I had purchased the ECS Tuning deluxe timing belt kit, the one that comes with the Cam Lock Bar and the Crank Lock Pin, so I was set with those items. I also found ECS’ timing belt DIY to be a good reference this time around. Of course no progress can get too far without discovering a missing item and the timing belt was not different. I’d managed to order a kit that had everything I needed, but I forget to get an accessory belt tensioner. It’s not a standard item in the kits but something I figured I’d go and change given the age of the car and the likelihood that it was the original part.
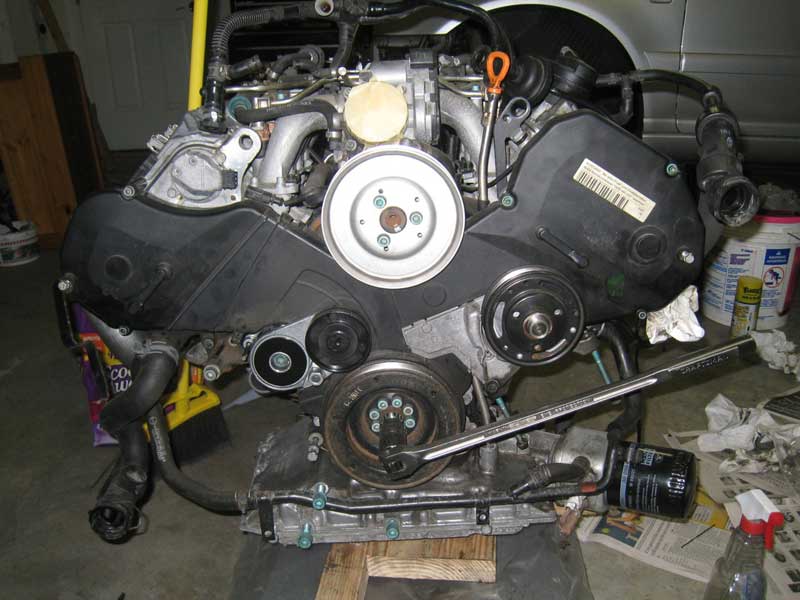 It’s the shiny new part to the upper left of the harmonic balancer. The timing mark on the harmonic balancer is really hard to see on this engine and I need to get some white paint to make it stand out some more.
After finishing the timing belt and water pump I moved onto the valve cover gaskets, cam chain tensioner seals, and cam plugs. What would this job be without a specialty tool, one which I did not have. Luckily another local S4 owner had the special tool and I was able to borrow it. This was my first time doing this job and I encountered some difficulty with the cam chain tensioner. First was getting the tool properly in place so that the tensioner could be raised far enough to remove the gasket and clean underneath – and this was on the passenger side, with the motor out of the car. By the way the passenger side is the easier of the two sides. On the drivers side the cam tensioner is sort of stuck in place because the timing belt shield goes right over it. Neither DIY write up I had said anything about this so I had to do some more digging around. One shop said to remove the bolts (3) that hold the shield in place and bend it out some. I tried that but it didn’t seem to improve the situation all that much. Another tip was to turn the crank a little which would allow the tensioner to raise further. I suppose that helped, but it was still very tight trying to get under there. I was finally able to get the gasket out but cleaning underneath there was hard.

That work was completed and once the valve covers were in place I pulled out the spark plugs from the old engine and put them in this motor. Why? Because the plugs in the old motor had not been in there very long and they were all gapped correctly. The plugs in the newer motor had a larger gap than what I wanted to use and I figured it would be just as hard to swap plugs as it would to gap all of the new plugs in the new motor, and I want to get a few more miles out of the old motor’s plugs.
After that I started to look at some of the hoses that may need replacing. I saw that the car had the original 710A DV’s and since I was going to put 710N’s on I removed the older DV’s. In the process of doing that the fabric covered vacuum line began to disintegrate, signaling another part I’d need to replace. It was at this point that I discovered that I did not have small enough Oetiker clamps to fit on the small hose, so I paused that hose replacement effort. I also replaced a couple of the fabric covered lines on the back of the engine.

I managed to crack one of the spider hose lines in the process of removing that part, so I’ll be trying to upgrade all the arms since it’s probable another part will fail on it.
The TIP cars have an extra bracket welded onto the coolant hard line that runs behind the engine. This was no longer going to be used and since I can anticipate needing to get my hands and arms back behind the engine at some point in the future I figured it would be prudent to get rid of that bracket to make maneuvering around back there easier. Out came a cutoff wheel and metal file and after about thirty minutes the bracket was gone and the remnants filed down smooth.

Thinking ahead to larger intercoolers and what it will take to accommodate them I proceeded to drill out the rivets holding the stock intercooler bracket in place and popped that piece out. The passenger side will be next along with preemptively relocating the A/C condenser.

I’m also in the process of wire brushing some rust spots on the front subframe so that I can give it a POR-15 treatment sometime in the near future.