This is a summary of the steps I followed to use RS6 EGT’s in my B5 S4 in place of the stock EGT sensors which have a limited range.
Using TunerPro to revise the S4’s ME7 to read RS6 EGT sensors
Before starting, ensure the following are accessible:
- TunerPro
- S4 binary file you wish to modify
- RS6 XDF
- S4 XDF
XDF files should be available at the Nefmoto website.
Setup Steps:
1. Open TunerPro
2. Select the RS6 XDF for use; it is not necessary to open a bin at this point.
Note: This guide will continue to refer to this as the RS6 XDF.
3. Open a second instance of TunerPro:
Tools > Custom Tools > New TunerPro Instance
Note: To distinguish between the two instances of TunerPro this guide will refer to the second instance as TunerPro2
4. In TunerPro2 open the XDF file that you use when modifying your S4’s bin file.
Note: This guide will refer to this as S4 XDF.
Goal: We are going to transfer several tables that exist in the RS6 XDF file over to the S4 XDF. Those tables are: TABGTA, DTPATS, TATSMN, TATSMX, 0x1C4BA – % or 0x1F8BA – %
5. In both instances of TunerPro set the Parameter Tree View By: selection to “Parameter Ordered List”
Moving the Tables
Use TunerPro to find the TABGTA table in RS6 XDF:
1. CTRL-F
2. Select: Find “Any Parameter” “With This Phrase in the Title”
3. Enter into: Word(s): “TABGTA”
4. Search
One item (TABGTA) should be found and be listed in the search results window.
If you select the returned item (TABGTA) TunerPro should highlight the table name in the Parameter Tree list.
1. Use the cursor to highlight TABGTA in the Parameter Tree
2. Right Click and select “Copy XDF Parameter to Clipboard”, or CTRL-C to copy TABGTA to the clipboard.
3. Move over to TunerPro2 and mouse click in the Parameter Tree window.
4. Right Click and select “Paste XDF Parameter from Clipboard” or CTRL-V to paste the TABGTA table into the S4 XDF.
5. The TABGTA table should now be in the Parameter Tree for the S4 XDF.
6. Select TABGTA for the S4 XDF
7. Right Click on it and select “Edit Parameter XDF Info” or press F2.
8. In the new window the “General” tab should be active.
9. Find the “Category A” pull down and click on it to show available categories to which the new table can be assigned.
10. Select a category to assign the TABGTA table, for example “Exhaust gas temperature”.
11. Select Apply then Close
You have now moved the TABGTA table from the RS6 XDF over to the S4 XDF. Repeat the Moving the Tables steps for the other tables, DTPATS, TATSMN, TATSMX, 0x1F8BA – %.
Note: Because there is no binary loaded the values you see in the tables may not be correct, this will be addressed.
0x1C4BA – %. Cannot be found in the RS6 XDF. 0x1F8BA was the value table in the RS6 XDF. 0x1C4BA seems to be unique to the 551 auto generated XDF.
Update table values
The first table to modify will be 0x1F8BA that sets the x-axis values for the TABGTA table.
In TunerPro2 Open the S4 binary file that you will be modifying to use with the RS6 EGT sensors.
1. File
2. Open Bin…
3. Using the S4 XDF in TunerPro2
4. Select 0x1F8BA from the Parameter Tree
5. Right Click on it
6. Select “Edit Parameter in Bin”
7. The table should pop open in a new window with the ability to edit the table values.
8. Enter the following values starting at the top and working down:
4
32
36
40
44
48
52
56
60
64
68
72
76
80
84
88
92
96
9. Commit Changes by selecting the Icon that looks like a 3.5” floppy disk.
10. Select TABGTA
11. Right Click on it
12. Select “Edit Parameter in Bin”
13. The table should pop open in a new window with the ability to edit the table values.
14. Enter the following values starting at the top and working down:
-40.00
310.00
360.00
410.00
460.00
510.00
560.00
610.00
660.00
710.00
760.00
810.00
860.00
910.00
960.00
1010.00
1060.00
1110.00
15. Commit Changes
16. Select TABGTA
17. Right Click on it and select “Edit Parameter XDF Info” or press F2.
18. Select the “Rows” tab.
19. In “Scale/Normalizer Link” section select “Browse”
20. From “XDF Item Browser” find the 0x1F8BA – % and select it.
21. Press “Ok”
22. Press “Apply” then “Close”
23. The x-axis values defined in 0x1F8BA – % should now be present in the x-axis column of TABGTA.
24. In the Parameter Tree list select DTPATS
25. Right Click on it
26. Select “Edit Parameter in Bin”
27. The table should pop open in a new window with the ability to edit the table values.
28. Enter the following value:
20
29. Commit Changes
30. In the Parameter Tree list select TATSMN
31. Right Click on it
32. Select “Edit Parameter in Bin”
33. The table should pop open in a new window with the ability to edit the table values.
34. Enter the following value:
-39
35. Commit Changes
36. In the Parameter Tree list select TATSMX
37. Right Click on it
38. Select “Edit Parameter in Bin”
39. The table should pop open in a new window with the ability to edit the table values.
40. Enter the following value:
1100
41. Commit Changes
42. Save the XDF
43. XDF > Save XDF As…
44. Provide a recognizable name
45. Press Save
46. Save the BIN file
47. File > Save Bin As…
48. Provide a recognizable name
49. Press Save
50. Now update the check sum and verify the check is correct as you normally would.
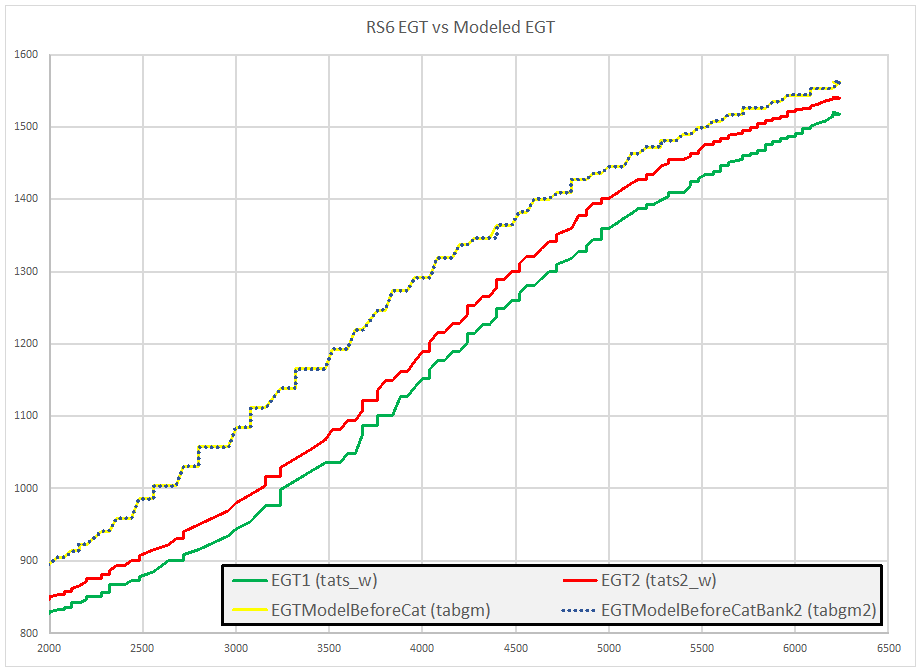
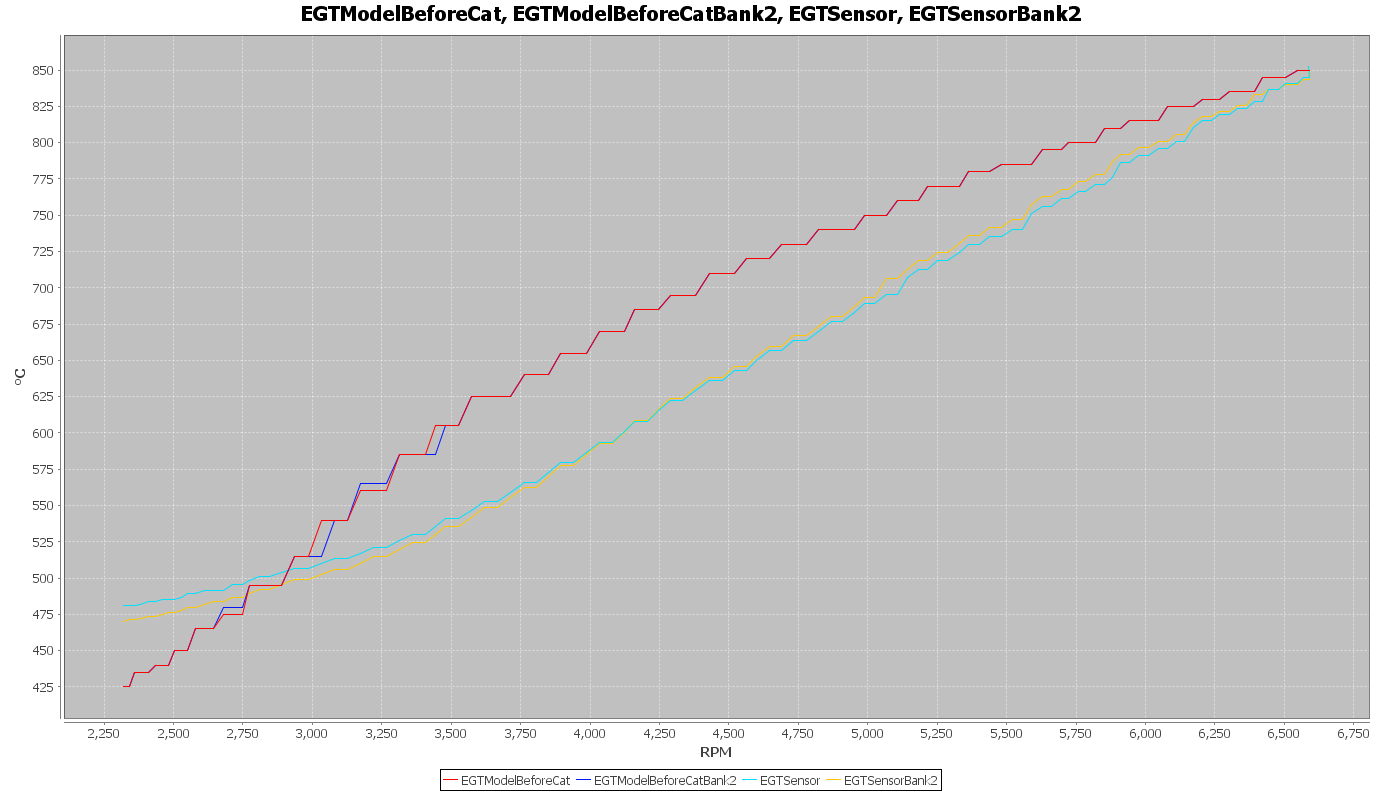
Below are some examples of the differences between the RS6 sensor read EGT values and the calculated values. As the car moves further from the stock setup, via tuning and hardware changes, the modeled EGT’s become less accurate.